okhttp框架解析

作为Android程序员除了Google官方提供Android源码,开发项目时还要用很多优秀的三方开源库帮助我们快速开发,OKhttp3作为square开源的网络库,已成Android程序员必用的网络库,因为其优秀的代码设计、完善的网络请求功能,也被Google收入官方源码实现。作为开发者学习作为网络的网络有很多分析OkHttp的文章,大多都是讲OkHttp的使用、框架结构以及设计模式等这些内容。而这些只是OkHttp的一些手段和方式,它本质上一个网络请求的库,我们阅读源码的时,实现只不过是为了达到目的一种方式,脱离目的的实现,如缘木求鱼。所以在分析OkHttp源码的时一定要结合http本身的特性,不然就很容易偏离事物本质。

1
2
3
4
5
6
7
8
9
10
11
12
13
14
thread {
val socket = Socket("hencoder.com", 80)
val reader = BufferedReader(InputStreamReader(socket.getInputStream()))
val writer = BufferedWriter(OutputStreamWriter(socket.getOutputStream()))

writer.write("GET / HTTP/1.1\nHost: hencoder.com\n\n")
writer.flush()

println(
"""
${reader.readText()}
""".trimIndent()
)
}

上面的代码是通过Socket实现一个简单的网络连接,而且是非常简陋。有很多内容没有考虑到,比如Http2、SSL、代理、重定向、错误重试等内容。如果把http请求的各种情况都考虑进去,然后自己动手撸个框架,这工作量还是很大。OKHttp就是这样从最底层的网络连接到Http的各种适配,底朝天的完全自己实现了一遍,而且

看源码之前,先从最简单OkHttp的使用开始

OkHttp使用方法简介

  1. 创建一个OkHttpClient实例

    1
    val client=OkHttpClient.Builder().build()
  2. 创建Request

    1
    2
    3
    4
    val url = "https://api.github.com/users/wds1204/repos"
    val request: Request = Request.Builder()
    .url(url)
    .build()
  3. 创建Call并发起网络请求

    1
    2
    3
    4
    5
    6
    7
    8
    //异步请求
    val newCall:Call=client.newCall(request)
    client.newCall(request).enqueue(object : Callback {
    override fun onFailure(call: Call, e: IOException) {}
    override fun onResponse(call: Call, response: Response) {
    println("okhttp response ${response.code}")
    }
    })

    分别构建OkHttpClientRequest,然后调用OkHttpClientnewCall,Request作为参数传入,返回一个Call对像。最终调Callenqueue方法,成功回调onResponse,失败回调onFailure

OkHttp源码分析

okhttp源码版本: 4.9.0

在上一小节中介绍了okHttp使用,可以看出整个流程很简而且也容易单上手分。其中OkHttpClientRequest都是通过Build模式构建,一个客户端对象、一个请求的配置,关键点是在newCall方法,进入方法内部:

OkHttpClient

1
override fun newCall(request: Request): Call = RealCall(this, request, forWebSocket = false)

引出RealCall对象。

RealCall

newCall返回的RealCall对象,会把此前构建OkHttpClientRequestcan对象用于创建RealCall,外还有forWebSocket参数,是用来是否支持webSocket协议的,本人对webSocket了解的也不够,感兴趣请自行查阅。接下来会调用RealCallenqueue这个异步请求方法。

RealCall

1
2
3
4
5
override fun enqueue(responseCallback: Callback) {
//...
callStart()
client.dispatcher.enqueue(AsyncCall(responseCallback))
}

分为两个部分:

  • callStart()
  • client.dispatcher.enqueue(AsyncCall(responseCallback))

callStart这个方法是用来触发监听的

1
2
3
4
private fun callStart() {
this.callStackTrace = Platform.get().getStackTraceForCloseable("response.body().close()")
eventListener.callStart(this)
}

EventListener

在构建OkHttpClient的时候可以通过eventListener或者eventListenerFactory方法添加EventListener监听。可以用它做http的网络监控,比如dns查询耗时、socket connnect耗时、tls连接耗时、请求发送耗时、响应传输耗时、响应解析耗时。后面遇到此类的就知道是什么涵义了。
image.png

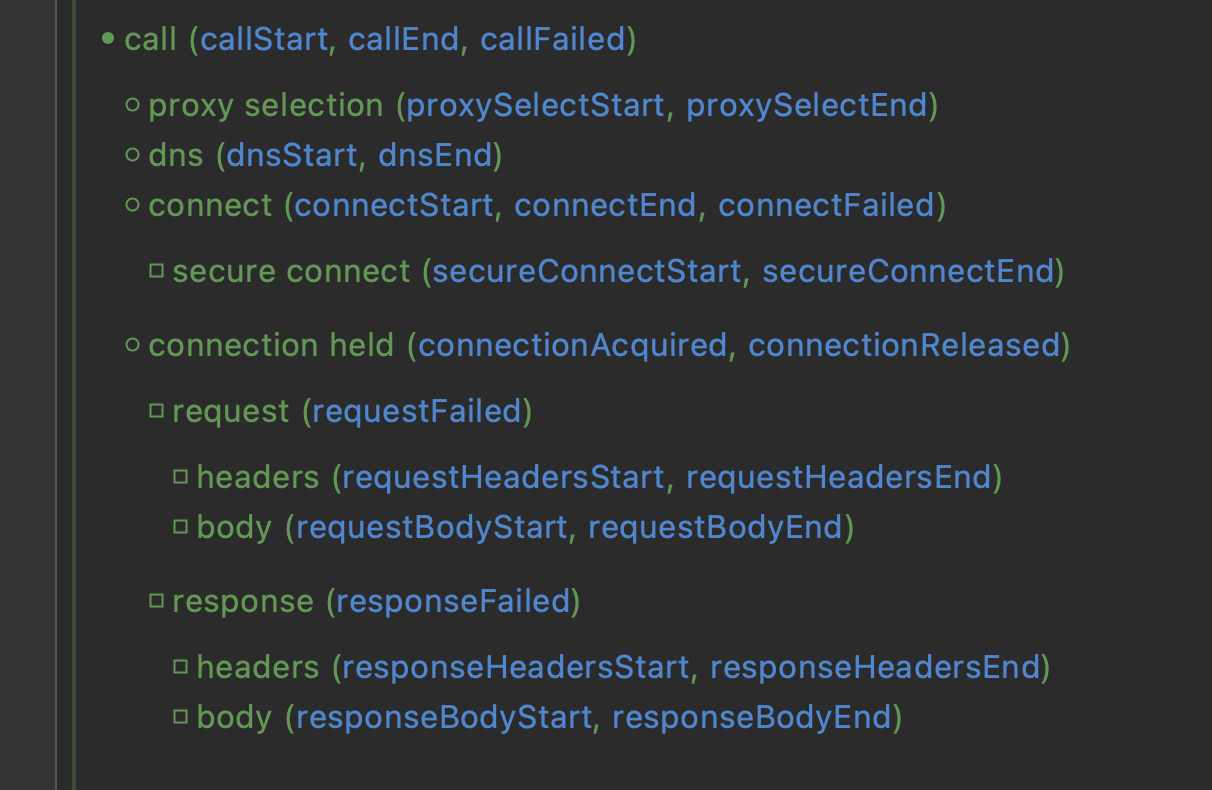
client.dispatcher.enqueue(AsyncCall(responseCallback)) 调用OkHttpClient中dispatch调度器的enqueue方法。dispatch一看名字就应该想到和线程池相关,

1
2
3
4
5
6
7
8
9
10
11
12
13
internal fun enqueue(call: AsyncCall) {
synchronized(this) {
readyAsyncCalls.add(call)//1把AsyncCall添加到readyAsyncCalls双向队列中

// Mutate the AsyncCall so that it shares the AtomicInteger of an existing running call to
// the same host.
if (!call.call.forWebSocket) {
val existingCall = findExistingCallWithHost(call.host)//2
if (existingCall != null) call.reuseCallsPerHostFrom(existingCall)//3
}
}
promoteAndExecute()
}

注释1AsyncCall添加到readyAsyncCalls双向队列中。注射2处找到相应hostAsyncCall,在注射3处会重用上一个AsyncCallcallsPerHost

1
2
3
4
5
6
7
8
internal inner class AsyncCall( private val responseCallback: Callback ) : Runnable {
@Volatile var callsPerHost = AtomicInteger(0)
private set
//...
fun reuseCallsPerHostFrom(other: AsyncCall) {
this.callsPerHost = other.callsPerHost
}
//...

这是什么意思呢,每个异步请求都会放到AsyncCall中,callsPerHost是个AtomicInterger,每次执行promoteAndExecute会调用incrementAndGet,异步任务成功执行后调用decrementAndGet。保持callsPerHost中的Int为0。就是为了标记同一个主机访问的次数。

结合promoteAndExecute方法会看的更清晰:

1
2
3
4
5
6
7
8
9
10
11
12
13
14
15
16
17
18
19
20
21
22
23
24
25
26
27
28
29
private fun promoteAndExecute(): Boolean {
this.assertThreadDoesntHoldLock()

val executableCalls = mutableListOf<AsyncCall>()
val isRunning: Boolean
synchronized(this) {
val i = readyAsyncCalls.iterator()
while (i.hasNext()) {
val asyncCall = i.next()
//maxRequests=64 并发执行的最大请求数
if (runningAsyncCalls.size >= this.maxRequests) break // Max capacity.
//maxRequestsPerHost=4,通过主机的最大请求数并发执行,如果大于等于4就直接continue
if (asyncCall.callsPerHost.get() >= this.maxRequestsPerHost) continue // Host max capacity.

i.remove()
asyncCall.callsPerHost.incrementAndGet()
executableCalls.add(asyncCall)//存放在可执行的集合中
runningAsyncCalls.add(asyncCall)//存在在runningAsyncCalls双向队列中
}
isRunning = runningCallsCount() > 0
}

for (i in 0 until executableCalls.size) {
val asyncCall = executableCalls[i]
asyncCall.executeOn(executorService)//调用AsyncCall的executeOn,ExecutorService为线程池
}

return isRunning
}

AsyncCall

每次调用RealCallenqueue都会创建一个AsyncCall,它是是RealCall的内部类,实现Runnable接口:

1
2
3
4
5
6
7
8
9
10
11
12
13
14
15
16
17
18
19
20
21
22
23
24
25
internal inner class AsyncCall(
private val responseCallback: Callback
) : Runnable {
//...
fun executeOn(executorService: ExecutorService) {
client.dispatcher.assertThreadDoesntHoldLock()

var success = false
try {
executorService.execute(this)//调用execute,最终回调AsyncCall的run方法
success = true
} catch (e: RejectedExecutionException) {
//发生异常
val ioException = InterruptedIOException("executor rejected")
ioException.initCause(e)
noMoreExchanges(ioException)
responseCallback.onFailure(this@RealCall, ioException)
} finally {
if (!success) {
client.dispatcher.finished(this) // This call is no longer running!
}
}
}
//...
}

回调AsyncCall的run方法:

1
2
3
4
5
6
7
8
9
10
11
12
13
14
15
16
17
18
19
20
21
22
23
24
25
26
27
28
29
30
31
32
33
34
35
36
internal inner class AsyncCall(
private val responseCallback: Callback
) : Runnable {
//...
override fun run() {
threadName("OkHttp ${redactedUrl()}") {
var signalledCallback = false
timeout.enter()
try {
//拿到响应的response
val response = getResponseWithInterceptorChain()
signalledCallback = true
//回调responseCallback.onResponse
responseCallback.onResponse(this@RealCall, response)
} catch (e: IOException) {
if (signalledCallback) {
// Do not signal the callback twice!
Platform.get().log("Callback failure for ${toLoggableString()}", Platform.INFO, e)
} else {
responseCallback.onFailure(this@RealCall, e)
}
} catch (t: Throwable) {
cancel()
if (!signalledCallback) {
val canceledException = IOException("canceled due to $t")
canceledException.addSuppressed(t)
responseCallback.onFailure(this@RealCall, canceledException)
}
throw t
} finally {
client.dispatcher.finished(this)
}
}
}
//...
}

getResponseWithInterceptorChain

通过getResponseWithInterceptorChain方法拿到这次请求的response,然后回调responseCallbackonResponse,如果失败回调onFailure。这里的responseCallback就是调用RealCall传入来的CallBack。到这里整个网络请求就结束了,是不是感觉就这🤔️Socket的连接呢🤔️TSL连接🤔️报文发送和接收响应🤔️所有的这些东西都包含在getResponseWithInterceptorChain方法中,也就大家说到OkHttp的时候都会提的拦截器模式。

1
2
3
4
5
6
7
8
9
10
11
12
13
14
15
16
17
18
19
20
21
22
23
24
25
26
27
28
29
30
31
32
33
34
35
36
37
38
39
40
41
42
43
internal fun getResponseWithInterceptorChain(): Response {
// Build a full stack of interceptors.
/*======== 1、添加拦截器 ========*/
val interceptors = mutableListOf<Interceptor>()
interceptors += client.interceptors
interceptors += RetryAndFollowUpInterceptor(client)
interceptors += BridgeInterceptor(client.cookieJar)
interceptors += CacheInterceptor(client.cache)
interceptors += ConnectInterceptor
if (!forWebSocket) {
interceptors += client.networkInterceptors
}
interceptors += CallServerInterceptor(forWebSocket)
//1、构建拦截器链RealInterceptorChain
val chain = RealInterceptorChain(
call = this,
interceptors = interceptors,
index = 0,
exchange = null,
request = originalRequest,
connectTimeoutMillis = client.connectTimeoutMillis,
readTimeoutMillis = client.readTimeoutMillis,
writeTimeoutMillis = client.writeTimeoutMillis
)

var calledNoMoreExchanges = false
try {
//3、开启链式工作
val response = chain.proceed(originalRequest)
if (isCanceled()) {
response.closeQuietly()
throw IOException("Canceled")
}
return response
} catch (e: IOException) {
calledNoMoreExchanges = true
throw noMoreExchanges(e) as Throwable
} finally {
if (!calledNoMoreExchanges) {
noMoreExchanges(null)
}
}
}

创建RealInterceptorChain对象,里面包含各种拦截(内置、自定义),然后调用RealInterceptorChain的proceed方法触发链式工作。

1
2
3
4
5
6
7
8
9
10
11
12
13
14
15
16
17
18
19
20
21
22
23
24
25
26
27
28
29
30
31
32
override fun proceed(request: Request): Response {
check(index < interceptors.size)

calls++

if (exchange != null) {
check(exchange.finder.sameHostAndPort(request.url)) {
"network interceptor ${interceptors[index - 1]} must retain the same host and port"
}
check(calls == 1) {
"network interceptor ${interceptors[index - 1]} must call proceed() exactly once"
}
}

// Call the next interceptor in the chain.
val next = copy(index = index + 1, request = request)
val interceptor = interceptors[index]

@Suppress("USELESS_ELVIS")
val response = interceptor.intercept(next) ?: throw NullPointerException(
"interceptor $interceptor returned null")

if (exchange != null) {
check(index + 1 >= interceptors.size || next.calls == 1) {
"network interceptor $interceptor must call proceed() exactly once"
}
}

check(response.body != null) { "interceptor $interceptor returned a response with no body" }

return response
}

val next = copy(index = index + 1, request = request)RealInterceptorChain当前interceptors的index前移一位。
val interceptor = interceptors[index]找到当前的interceptor,然后调用interceptorintercept方法处具体的拦截器方法。刚触发链表工作时,如果有没添加自定义拦截器到interceptors的,第一个运行拦截器就是RetryAndFollowUpInterceptor

RetryAndFollowUpInterceptor

1
2
3
4
5
6
7
8
9
10
11
12
override fun intercept(chain: Interceptor.Chain): Response {
val realChain = chain as RealInterceptorChain
var request = chain.request
//...
while (true) {
//...
response = realChain.proceed(request)
//...
return response
}
//...
}

RetryAndFollowUpInterceptorintercept方法内又会调用RealInterceptorChainproceed方法。此时RealInterceptorChain中的interceptors的index已经往前移了一位,所以会执行下一个拦截器,最后一直执行到最后一个拦截器,然后以往前传递当前拦截器的``response`
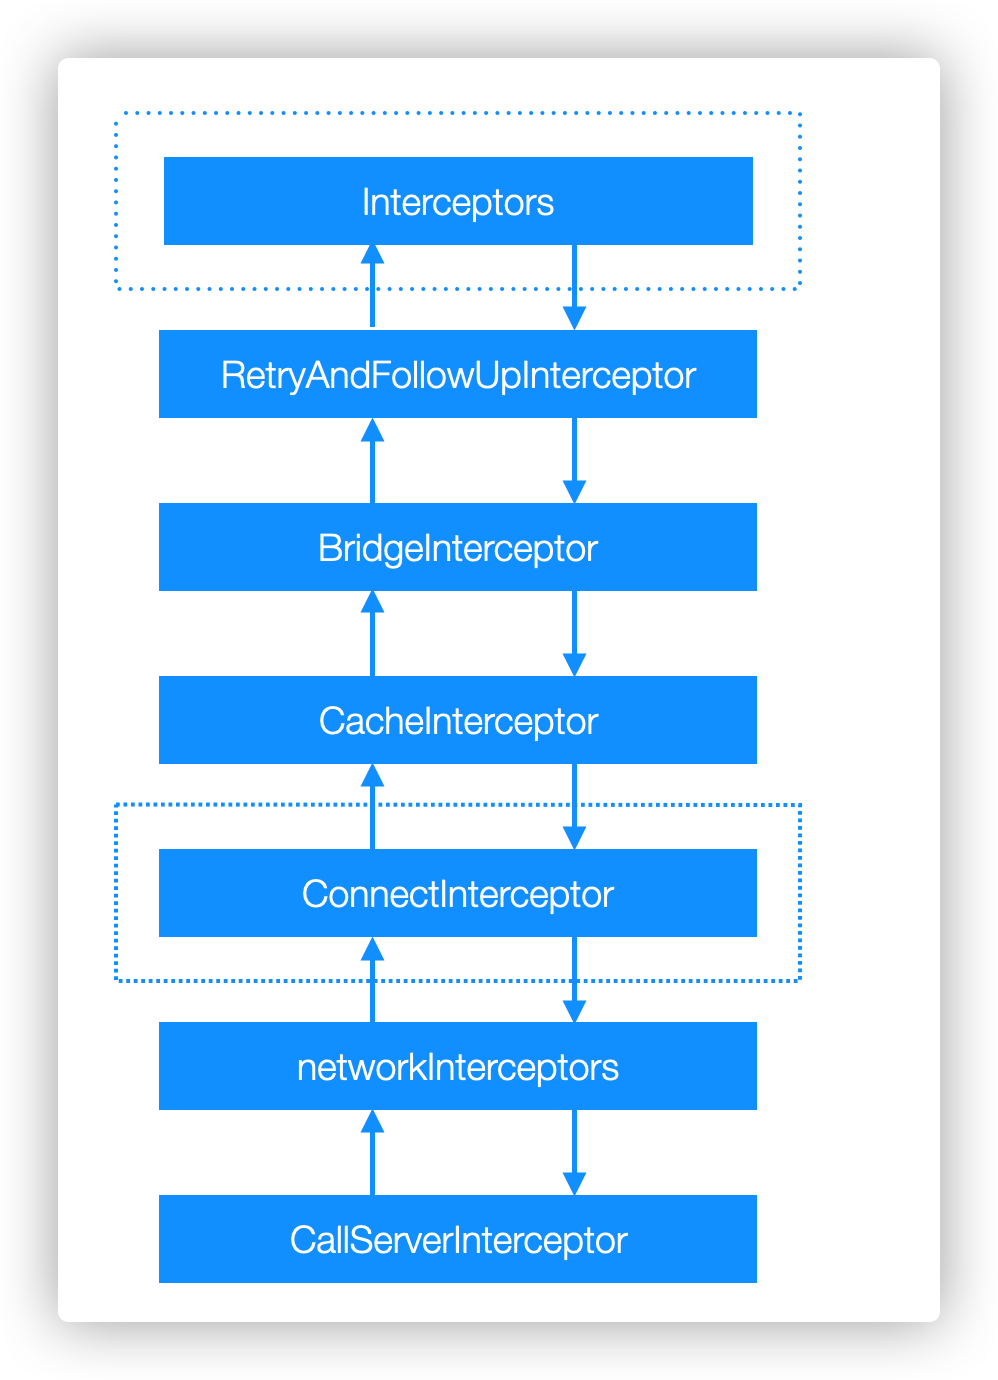
之所以把OkHttp的拦截器设计成三个步骤:触发前段、触发拦截器、触发后段。应该是考虑到网络请求的特性,我们通过需要在请求前和请求后分别做一些干预操作,这样设计便于处理。下面给出一张拦截器流程图:

interceptor.png

OKHttp配置简介

补充一下OKHttpClient相关内容,它相当于配置中心,所有的请求都会共享这些配置(例如出错是否重拾、共享的连接池)。OkHttpClient中配置主要有:

  • dispatcher: Dispatcher:调用器,用于调度后台发起的网路请求,有后台总请求数和单主机总请求数的控制。
  • protocols: List<Protocol>: 支持的应用层协议,即HTTP/1.1、HTTP/2等。
  • connectionSpecs: List<ConnectionSpec>: 应用层支持的Socket设置,即使用明文传输(HTTP),还是某个版本的TLS(HTTPS)
  • interceptors: List<Interceptor>:拦截器,大多数时候使用的 Interceptor 都应该配置到这里。
  • networkInterceptors: List<Interceptor>:直接和网络请求交互的 Interceptor 配置到这里,例如如果你想查看返回的 301报文或者未解压的Response Body,需要在这里看。
  • cookieJar: CookieJar:管理Cookie的控制器,OkHttp提供了对Cookie存取的支持,但没有给出具体的存取实现,默认是个NO_COOKIES,如果需要存取 Cookie,你得自己完成实现。
  • cache: Cache:Cache的默认的配置也是没有的,如果需要需自己配置Cache存储文件的位置、存储空间的上线以及缓存策略。
  • hostnameVerifier: HostnameVerifier:用于验证HTTPS握手过程下载的证书所属者是否和自己要访问的主机域名是否一致。
  • hostnameVerifier: HostnameVerifier :用于验证 HTTPS 握手过程 中下载到的证书所属者是否和自己要访问的主机名一致。
  • certificatePinner: CertificatePinner :用于设置 HTTPS 握手 过程中针对某个 Host 额外的的 Certificate Public Key Pinner,即把网站证 书链中的每一个证书公钥直接拿来提前配置进 OkHttpClient 里去,作为正 常的证书验证机制之外的一次额外验证。
  • authenticator: Authenticator :用于自动重新认证。配置之后,在 请求收到 401 状态码的响应是,会直接调用 authenticator ,手动加 入 Authorization header 之后自动重新发起请求。
  • followRedirects: boolean :遇到重定向的要求是,是否自动 follow。
  • followSslRedirects: boolean: 在重定向时,如果原先请求的是http而重定向的目标是https,或者原先请求的是 https 而重定向的目标是 http,是否依然自动 follow。(记得,不是「是否自动 follow HTTPS URL重定向的意思,而是是否自动 follow 在 HTTP 和 HTTPS 之间切换的重定 向)
  • retryOnConnectionFailure: boolean:在请求失败的时候是否自动重试。注意,大多数的请求失败并不属于 OkHttp 所定义的「需要重试」,这种重试只适用于「同一个域名的多个 IP 切换重试」「Socket 失效重试」等情况。
  • connectTimeoutMillis:Int :建立连接(TCP 或 TLS)的超时时间。
  • readTimeoutMillis:Int :发起请求到读到响应数据的超时时间。
  • writeTimeoutMillis :Int :发起请求并被目标服务器接受的超时时间。(为什么?因为有时候对方服务器可能由于某种原因而不读取你的 Request) newCall(Request) 方法会返回一个RealCall对象,它是Call接口