AGP资源编译之MergeResources流程分析

自AGP3.0起,默认的资源打包工具从AAPT v1版本升级为v2。APPT2的可执行文件存放在Android SDK的build-tools/$version路径下。在AAPT1中通过package命令把原始的资源文件编译成各式的二进制文件,并且压缩到一个ZIP归档中,升级到AAPT2后,编译的过程交由compile命令处理,合并归档的操作交给了link命令处理。AGP7.x+的代码中,AAPT1的内容相关的代码都已被删除。本次分析的AGP源码版本7.2.

MergeResourcesAGP执行编译任务的实现类,因为Merg‘eResources继承至NewIncrementalTask,支持增量构建(Incremental Build)
Task最终会执行doTaskAction:

1
2
3
4
5
6
7
8
9
10
11
12
13
14
public void doTaskAction(@NonNull InputChanges changedInputs) {
if (!changedInputs.isIncremental()) {//全量构建
try {
getLogger().info("[MergeResources] Inputs are non-incremental full task action.");
doFullTaskAction();
} catch (IOException | JAXBException e) {
throw new RuntimeException(e);
}
return;
}
//下面是增量构建的逻辑
...
}

Gradle传入了InputChanges增量检测工具。我们可以利用它获取本次构建是否增量或是全量。增量和全量编译的流程大体是差不多的,增量编译需要考虑资源来源还有解析上次编译的产物比如merger.xml等。为了更加直观了解资源的编译,这里直接分析全量的过程。所以进入doFullTaskAction方法:

1
2
3
4
5
6
7
8
9
10
11
12
13
14
15
16
17
18
19
20
21
22
23
24
25
26
27
28
29
30
31
32
33
34
35
36
37
38
39
40
41
42
43
44
45
46
47
48
49
50
51
52
53
54
55
56
57
protected void doFullTaskAction() throws IOException, JAXBException {
...
//1. 获取所有依赖资源
List<ResourceSet> resourceSets =
getConfiguredResourceSets(preprocessor, getAaptEnv().getOrNull());

// create a new merger and populate it with the sets.
//2.创建一个ResourceMerger,后面会把resourceSets对其进行填充
ResourceMerger merger = new ResourceMerger(getMinSdk().get());
...

//3 创建WorkerExecutorFacade、ResourceCompilatonService
try (WorkerExecutorFacade workerExecutorFacade = getAaptWorkerFacade();
ResourceCompilationService resourceCompiler =
getResourceProcessor(
this,
flags,
processResources,
getAapt2())) {
...
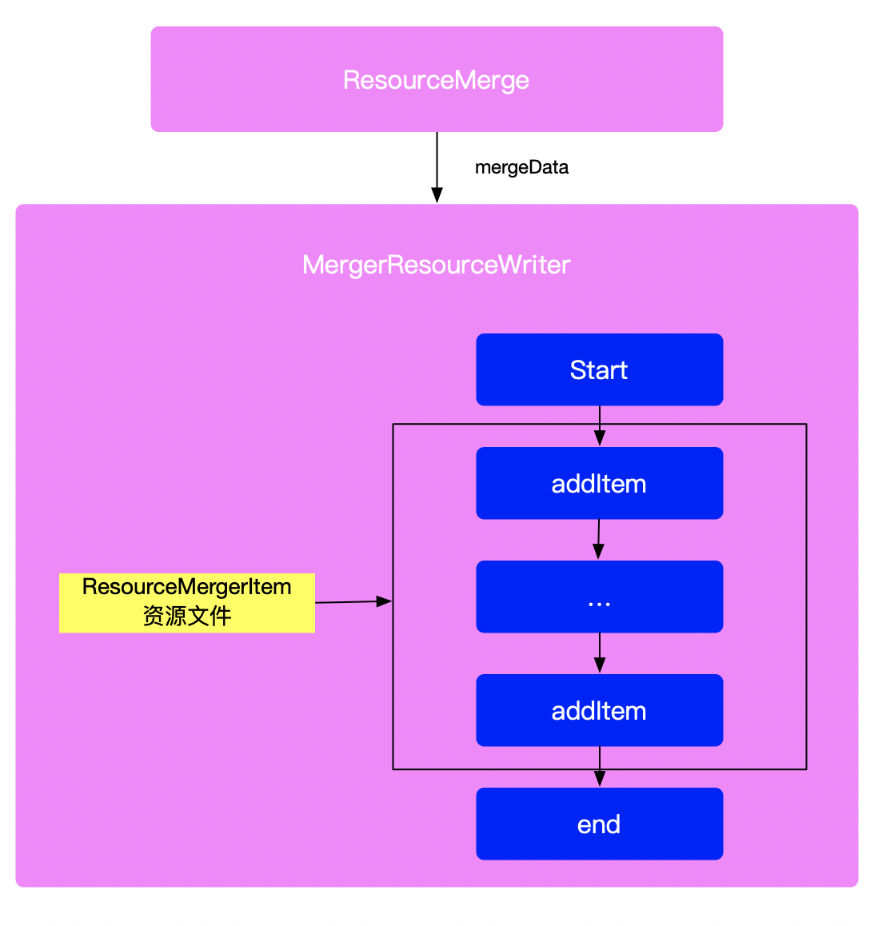
Blocks.recordSpan(
getPath(),
GradleBuildProfileSpan.ExecutionType.TASK_EXECUTION_PHASE_1,
getAnalyticsService().get(),
() -> {
for (ResourceSet resourceSet : resourceSets) {
resourceSet.loadFromFiles(new LoggerWrapper(getLogger()));
merger.addDataSet(resourceSet);//4.填充resourceSet
}
});
...
//5 创建MergedResourceWriter
MergedResourceWriter writer =
new MergedResourceWriter(
new MergedResourceWriterRequest(
workerExecutorFacade,//worker
destinationDir,
publicFile,
mergingLog,
preprocessor,
resourceCompiler,//
incrementalFolder,
dataBindingLayoutProcessor,
mergedNotCompiledResourcesOutputDirectory,
getPseudoLocalesEnabled().get(),
getCrunchPng(),
sourceSetPaths));

Blocks.recordSpan(
getPath(),
GradleBuildProfileSpan.ExecutionType.TASK_EXECUTION_PHASE_2,
getAnalyticsService().get(),
() -> merger.mergeData(writer, false /*doCleanUp*/));//6.调用mergeData方法
...
} //...
}

doFullTaskAction方法我剔除其它不关键的代码,只保留了主要流程。

  1. getConfiguredResourceSets获取项目中所以资源(包装成ResourceSet)包括依赖库中的,存放在resourceSets集合中。

  2. 创建一个ResourceMerge

  3. 创建WorkerExecutorFacadeResourceCompilatonService。对于老司机看到try(a){}catch{}这种Java7 引入的try-with-resouces语法糖。括号内的象肯定实现AutoCloseable接口,在代码块执行完毕后会自动调用对象的close()方法。回到本例子中需要重点关注ResourceCompilatonServiceclose()方法。**资源的compile过程都在这里面,稍后会重点分析**

    1. WorkerExecutorFacade包装了WorkerExecutor,提升编译速度需要多个资源并行compile,就会用到了这里的WorkerExecutor
    2. ResourceCompilatonService具体实现类是WorkerExecutorResourceCompilationService
      1
      2
      3
      public WorkerExecutorFacade getAaptWorkerFacade() {
      return Workers.INSTANCE.withGradleWorkers(getProjectPath().get(), getPath(), getWorkerExecutor(), getAnalyticsService());
      }
  4. 把步骤1种获取的资源集合添加到步骤2中的ResourceMerge

  5. 创建MergedResourceWriter对象的时候注入了MergedResourceWriterRequest,同时MergedResourceWriterRequest又持有WorkerExecutorFacadeResourceCompilatonService

  6. 调用mergeData方法,注入步骤5中创建的MergedResourceWriter对象。

    mergeData

    ResourceMergermergeData方法比较复杂,
    image.png

    1
    2
    3
    4
    5
    6
    7
    public class ResourceMerger{
    public void mergeData(@NonNull MergeConsumer<ResourceMergerItem> consumer, boolean doCleanUp)
    throws MergingException {
    clearFilterCache();
    super.mergeData(consumer, doCleanUp);
    }
    }

    调用父类的mergeData:

    1
    2
    3
    4
    5
    6
    7
    8
    9
    10
    11
    12
    13
    14
    15
    16
    17
    18
    19
    20
    21
    22
    23
    24
    25
    26
    27
    28
    29
    30
    31
    32
    33
    34
    35
    36
    37
    38
    39
    40
    41
    42
    43
    44
    45
    46
    public void mergeData(@NonNull MergeConsumer<I> consumer, boolean doCleanUp)
    throws MergingException {
    consumer.start(mFactory);//xian
    try {
    // get all the items keys.
    Set<String> dataItemKeys = new HashSet<>();
    //遍历获取所有资源的key
    for (S dataSet : mDataSets) {//mDataSets就是之前
    // quick check on duplicates in the resource set.
    dataSet.checkItems();
    ListMultimap<String, I> map = dataSet.getDataMap();
    dataItemKeys.addAll(map.keySet());
    }

    // loop on all the data items.
    for (String dataItemKey : dataItemKeys) {
    //如果是styleable资源的话进行styleable的merge
    if (requiresMerge(dataItemKey)) {
    // get all the available items, from the lower priority, to the higher
    // priority
    List<I> items = new ArrayList<>(mDataSets.size());
    for (S dataSet : mDataSets) {

    // look for the resource key in the set
    ListMultimap<String, I> itemMap = dataSet.getDataMap();

    if (itemMap.containsKey(dataItemKey)) {
    List<I> setItems = itemMap.get(dataItemKey);
    items.addAll(setItems);
    }
    }
    mergeItems(dataItemKey, items, consumer);
    continue;
    }
    //...
    }

    }
    }
    @Override
    public void start(@NonNull DocumentBuilderFactory factory) throws ConsumerException {
    super.start(factory);
    mValuesResMap = ArrayListMultimap.create();
    mQualifierWithDeletedValues = Sets.newHashSet();
    mFactory = factory;
    }

    先调用consumer的start方法,初始化mValuesResMapmQulifierWithDeletedValues,后续会往这两个容器塞入值。
    接下来是mDataSets ,它就是之前给ResourceMerge添加进来的ResourceSet资源对象集合。然后通过 dataSet.getDataMap()获取ResourceSet里面所有的资源,这个map中的key的结构:类型/资源名,value的类型是DataItem
    image.png
    判断之前保存的key对应的资源类型是不是styleable资源,会走mergeItems支路。我们就不在这个支路做过多的停留,回到主干探索主逻辑:

    1
    2
    3
    4
    5
    6
    7
    8
    9
    10
    11
    12
    13
    14
    15
    16
    17
    18
    19
    20
    21
    22
    23
    24
    25
    26
    27
    28
    29
    30
    31
    32
    33
    34
    35
    36
    37
    38
    39
    40
    41
    42
    43
    44
    45
    46
    47
    48
    49
    50
    51
    52
    53
    54
    55
    56
    57
    58
    59
    60
    61
    62
    63
    64
    65
    66
    67
    68
    69
    70
    71
    72
    73
    74
    75
    76
    77
    78
    79
    80
    81
    82
    83
    84
    85
    86
    87
    88
    89
    90
    91
    92
    93
    94
    95
    96
    97
    public void mergeData(@NonNull MergeConsumer<I> consumer, boolean doCleanUp)
    throws MergingException {
    consumer.start(mFactory);

    try {
    // get all the items keys.
    Set<String> dataItemKeys = new HashSet<>();

    for (S dataSet : mDataSets) {
    // quick check on duplicates in the resource set.
    dataSet.checkItems();
    ListMultimap<String, I> map = dataSet.getDataMap();
    dataItemKeys.addAll(map.keySet());
    }

    // loop on all the data items.
    for (String dataItemKey : dataItemKeys) {
    ...

    // for each items, look in the data sets, starting from the end of the list.
    I previouslyWritten = null;
    I toWrite = null;

    boolean foundIgnoredItem = false;

    setLoop: for (int i = mDataSets.size() - 1 ; i >= 0 ; i--) {
    S dataSet = mDataSets.get(i);

    // look for the resource key in the set
    ListMultimap<String, I> itemMap = dataSet.getDataMap();

    if (!itemMap.containsKey(dataItemKey)) {
    continue;
    }
    List<I> items = itemMap.get(dataItemKey);
    if (items.isEmpty()) {
    continue;
    }

    for (int ii = items.size() - 1 ; ii >= 0 ; ii--) {
    I item = items.get(ii);

    if (consumer.ignoreItemInMerge(item)) {
    foundIgnoredItem = true;
    continue;
    }

    if (item.isWritten()) {
    assert previouslyWritten == null;
    previouslyWritten = item;
    }

    if (toWrite == null && !item.isRemoved()) {
    toWrite = item;
    }

    if (toWrite != null && previouslyWritten != null) {
    break setLoop;
    }
    }
    }

    assert foundIgnoredItem || previouslyWritten != null || toWrite != null;

    if (toWrite != null && !filterAccept(toWrite)) {
    toWrite = null;
    }
    if (previouslyWritten == null && toWrite == null) {
    continue;
    }
    if (toWrite == null) {
    // nothing to write? delete only then.
    assert previouslyWritten.isRemoved();

    consumer.removeItem(previouslyWritten, null /*replacedBy*/);

    } else if (previouslyWritten == null || previouslyWritten == toWrite) {
    // easy one: new or updated res
    consumer.addItem(toWrite);//
    } else {
    // replacement of a resource by another.

    // force write the new value
    toWrite.setTouched();
    consumer.addItem(toWrite);
    // and remove the old one
    consumer.removeItem(previouslyWritten, toWrite);
    }
    }
    } finally {
    consumer.end();//添加资源后走consumer.end()方法
    }

    if (doCleanUp) {
    postMergeCleanUp();
    }
    }

    setLoop: for循环这部分的代码还没看理清楚具体什么逻辑😶‍🌫️😶‍🌫️😶‍🌫️😶‍🌫️😶‍🌫️😶‍🌫️,但不影响后面的分析。
    收集完所有key之后,下面就是遍历所有ResourceSet对象,找到对应的资源并且调addItem方法把资源回调给consumer,最后调用consumerendconsumer其实就是前面创建的MergedResourceWriter对象,我们跟进去看下它的addItem方法,代码如下:

    1
    2
    3
    4
    5
    6
    7
    8
    9
    10
    11
    12
    13
    14
    15
    16
    17
    18
    19
    20
    21
    22
    23
    24
    25
    26
    27
    28
    29
    30
    31
    32
    33
    34
    35
    36
    37
    38
    @Override
    public void addItem(@NonNull final ResourceMergerItem item) throws ConsumerException {
    final ResourceFile.FileType type = item.getSourceType();

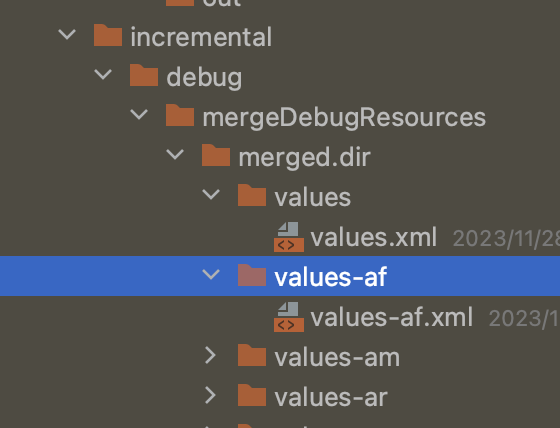
    if (type == ResourceFile.FileType.XML_VALUES) {
    mValuesResMap.put(item.getQualifiers(), item);
    } else {
    checkState(item.getSourceFile() != null);
    // This is a single value file or a set of generated files. Only write it if the state
    // is TOUCHED.
    if (item.isTouched()) {
    File file = item.getFile();
    String folderName = getFolderName(item);

    if (type == DataFile.FileType.GENERATED_FILES) {
    try {
    FileGenerationParameters workItem =
    new FileGenerationParameters(
    item, mergeWriterRequest.getPreprocessor());
    if (workItem.resourceItem.getSourceFile() != null) {
    getExecutor().submit(new FileGenerationWorkAction(workItem));
    }
    } catch (Exception e) {
    throw new ConsumerException(e, item.getSourceFile().getFile());
    }
    }

    // enlist a new crunching request.
    CompileResourceRequest crunchRequest =
    new CompileResourceRequest(
    file, getRootFolder(), folderName, item.mIsFromDependency);
    if (!mergeWriterRequest.getModuleSourceSets().isEmpty()) {
    crunchRequest.useRelativeSourcePath(mergeWriterRequest.getModuleSourceSets());
    }
    mCompileResourceRequests.add(crunchRequest);
    }
    }
    }
  7. values目录下的xml资源文件会保存在mValuesResMap里,该map中的key是通过getQualifiers方法返回。

    1. 如果说需要配置多国语言或多个主题,需要创建多个不同后缀values文件夹values-en-rUS、values-CN、values-night…等等。getQualifiers这个方法返回的key就是就是文件夹的后缀。比如value-en-rUS这个文件夹返回的key就是en-rUs.
  8. 非values目录下的xml资源layoutdrawable等。会构造出一个CompileResourceRequest对象包含了需要编译的资源信息,并保存到mCompileResourceRequests集合中。

到这里mValuesResMapmCompileResourceRequests已经填充了对应的数据,addItem方法也分析完了,最后就是consumer.end()方法。

1
2
3
4
5
6
7
8
9
10
11
12
13
14
15
16
17
18
19
20
21
22
23
24
25
26
27
28
public void end() throws ConsumerException {
// Make sure all PNGs are generated first.
super.end();
try {
//省略代码...
while (!mCompileResourceRequests.isEmpty()) {
//从mCompileResourceRequests取出request
CompileResourceRequest request = mCompileResourceRequests.poll();
//省略代码...
//构建CompileResourceRequest
CompileResourceRequest compileResourceRequest =
new CompileResourceRequest(
fileToCompile,
request.getOutputDirectory(),
request.getInputDirectoryName(),
request.getInputFileIsFromDependency(),
mergeWriterRequest.getPseudoLocalesEnabled(),
mergeWriterRequest.getCrunchPng(),
ImmutableMap.of(),
request.getInputFile());

//通过submitCompile提交
mergeWriterRequest
.getResourceCompilationService()
.submitCompile(compileResourceRequest);
}
//省略代码...
}

先说
进入MergedResourceWriterend方法先调其父类的end方法,在父类的end方法又会调用postWriteAction:

1
2
3
4
5
6
7
8
9
10
11
12
13
14
15
16
17
18
19
20
21
22
23
24
25
26
27
28
29
30
31
32
33
34
35
36
37
38
39
40
41
42
43
44
45
46
47
48
49
50
51
52
53
54
55
56
57
58
59
60
61
62
63
64
65
66
67
68
69
70
71
72
73
74
75
76
77
78
79
80
81
82
83
84
85
86
87
88
89
90
91
92
93
94
95
96
97
98
99
100
101
102
103
104
105
106
107
108
109
110
111
112
113
114
115
116
117
118
119
120
121
122
123
124
125
126
127
128
129
130
131
132
133
134
135
136
137
138
139
140
141
142
143
144
145
146
147
148
149
150
151
@Override
protected void postWriteAction() throws ConsumerException {

/*
* 文件夹的路径build/intermediates/incremental/debug/mergeDebugResources/merged.dir
* 创建一个临时目录,在处理合并的XML文件之前将其放置在该目录中
*/
File tmpDir =
new File(
mergeWriterRequest.getTemporaryDirectory(), SdkConstants.FD_MERGED_DOT_DIR);
try {
FileUtils.cleanOutputDir(tmpDir);
} catch (IOException e) {
throw new ConsumerException(e);
}

// now write the values files.
for (String key : mValuesResMap.keySet()) {
boolean mustWriteFile = mQualifierWithDeletedValues.remove(key);

List<ResourceMergerItem> items = mValuesResMap.get(key);

if (!mustWriteFile) {
for (ResourceMergerItem item : items) {
if (item.isTouched()) {
mustWriteFile = true;
break;
}
}
}

if (mustWriteFile) {
/*
*
* 把之前收集values类型的xml资源写入到${tmpDir}/values XXX/values XXX.xml
*/
try {
String folderName = key.isEmpty() ?
ResourceFolderType.VALUES.getName() :
ResourceFolderType.VALUES.getName() + RES_QUALIFIER_SEP + key;

File valuesFolder = new File(tmpDir, folderName);
File outFile = new File(valuesFolder, folderName + DOT_XML);

FileUtils.mkdirs(valuesFolder);

DocumentBuilder builder = mFactory.newDocumentBuilder();
Document document = builder.newDocument();
final String publicTag = ResourceType.PUBLIC.getName();
List<Node> publicNodes = null;

Node rootNode = document.createElement(TAG_RESOURCES);
document.appendChild(rootNode);

Collections.sort(items);

for (ResourceMergerItem item : items) {
Node nodeValue = item.getValue();
if (nodeValue != null && publicTag.equals(nodeValue.getNodeName())) {
if (publicNodes == null) {
publicNodes = Lists.newArrayList();
}
publicNodes.add(nodeValue);
continue;
}

rootNode.appendChild(document.createTextNode("\n "));

ResourceFile source = item.getSourceFile();

Node adoptedNode = NodeUtils.adoptNode(document, nodeValue);
if (source != null) {
if (adoptedNode.hasChildNodes()) {
for (int i = 0; i < adoptedNode.getChildNodes().getLength(); i++) {
Node child = adoptedNode.getChildNodes().item(i);
if (child instanceof Comment) {
adoptedNode.removeChild(child);
}
}
// Removes empty lines and spaces from nested resource tags.
adoptedNode.normalize();
}
XmlUtils.attachSourceFile(
adoptedNode, new SourceFile(source.getFile()));
}
rootNode.appendChild(adoptedNode);
}

// finish with a carriage return
rootNode.appendChild(document.createTextNode("\n"));

final String content;
Map<SourcePosition, SourceFilePosition> blame =
mMergingLog == null ? null : Maps.newLinkedHashMap();

if (blame != null) {
content = XmlUtils.toXml(document, blame);
} else {
content = XmlUtils.toXml(document);
}

Files.asCharSink(outFile, Charsets.UTF_8).write(content);

//封装成一个CompileResourceRequest
CompileResourceRequest request =
new CompileResourceRequest(
outFile,
getRootFolder(),
folderName,
null,
mergeWriterRequest.getPseudoLocalesEnabled(),
mergeWriterRequest.getCrunchPng(),
blame != null ? blame : ImmutableMap.of(),
outFile);
if (!mergeWriterRequest.getModuleSourceSets().isEmpty()) {
request.useRelativeSourcePath(mergeWriterRequest.getModuleSourceSets());
}

// If we are going to shrink resources, the resource shrinker needs to have the
// final merged uncompiled file.
if (mergeWriterRequest.getNotCompiledOutputDirectory() != null) {
File typeDir =
new File(
mergeWriterRequest.getNotCompiledOutputDirectory(),
folderName);
FileUtils.mkdirs(typeDir);
FileUtils.copyFileToDirectory(outFile, typeDir);
}

if (blame != null) {
File file =
mergeWriterRequest
.getResourceCompilationService()
.compileOutputFor(request);
String fileSourcePath = getSourceFilePath(file);
mMergingLog.logSource(new SourceFile(file), fileSourcePath, blame);

String outFileSourcePath = getSourceFilePath(outFile);
mMergingLog.logSource(new SourceFile(outFile), outFileSourcePath, blame);
}
//把这个request提交
mergeWriterRequest.getResourceCompilationService().submitCompile(request);
//省略后面的代码。。。
} catch (Exception e) {
throw new ConsumerException(e);
}
}
}


}

先创建build/intermediates/incremental/debug/mergeDebugResources/merged.dir文件夹。还记得之前的mValuesResMap吗?通过其value-key的形式生成文件目录名,文件名就是目录名+.xml。随后遍历key对应value再遍历——List<ResourceMergerItem>,获取资源文件对应的数据并写入到values-xxx.xml文件中。
image.png

构建成出一个CompileResourceRequest类型的request,然后通过submitCompile方法保存这个request

1
2
3
4
5
6
class WorkerExecutorResourceCompilationService{
override fun submitCompile(request: CompileResourceRequest) {
// b/73804575
requests.add(request)
}
}


compile

资源编译的过程在文章开头的部分就提到过,依据try-with-resouces语法糖机制,执行完代码块中的处理逻辑后,自动触发ResourceCompilatonServiceclose()方法。

1
2
3
4
5
6
7
8
9
10
11
12
13
14
15
16
17
18
19
20
21
22
23
24
25
26
27
28
29
30
31
32
33
34
35
36
37
38
39
40
41
42
43
44
45
46
47
override fun close() {
if (requests.isEmpty()) {
return
}
val maxWorkersCount = aapt2Input.maxWorkerCount.get()

// First remove all JVM res compiler compatible files to be consumed by the kotlin compiler.
//1.移除掉requests中所有供Koltin编译器和JVM资源编译器兼容的文件
val jvmRequests = requests.filter {
canCompileResourceInJvm(it.inputFile, it.isPngCrunching)
}
requests.removeAll(jvmRequests)

// Split all requests into buckets, giving each worker the same number of files to process
var ord = 0
val jvmBuckets =
jvmRequests.groupByTo(HashMap(maxWorkersCount)) { (ord++) % maxWorkersCount }
//2. 供Koltin编译器和JVM资源编译器兼容的文件交给ResourceCompilerRunnable处理
jvmBuckets.values.forEach { bucket ->
workerExecutor.noIsolation()
.submit(ResourceCompilerRunnable::class.java) {
it.initializeWith(projectPath = projectPath, taskOwner = taskOwner, analyticsService = analyticsService)
it.request.set(bucket)
}
}

requests.sortWith(compareBy({ getExtension(it.inputFile) }, { it.inputFile.length() }))
val buckets = minOf(requests.size, aapt2Input.maxAapt2Daemons.get())

for (bucket in 0 until buckets) {
val bucketRequests = requests.filterIndexed { i, _ ->
i.rem(buckets) == bucket
}
// b/73804575
//3.requests 剩余的CompileResourceRequest交给Aapt2CompileRunnable处理
workerExecutor.noIsolation().submit(
Aapt2CompileRunnable::class.java
) {
it.initializeWith(projectPath = projectPath, taskOwner = taskOwner, analyticsService = analyticsService)
it.aapt2Input.set(aapt2Input)
it.requests.set(bucketRequests)
it.enableBlame.set(true)
}
}
requests.clear()

}

之前看其它文章介绍AGP资源的编译,都是笼统的说通过使用AAPT2这个工具。但看代码后发现其实并不是这样,只有XXX.9.png或者png图片在配置了requirePngCrunching情况下需要用AAPT2来进行编译,其它情况直接用com.android.tools.build:aaptcompile这个组件直接编译成AGP自己定义的proto格式的文件。之所以这么做我想应该是通过使用AAPT2命令行工具毕竟需要开启一个新进程然后进行通信,如果直接可以使用一个线程就能完成资源编译当然更好。
如何区分使用那种编译方式用到的方法:canCompileResourceInJvm(file: File, requirePngCrunching: Boolean)方法:

1
2
3
4
5
6
7
8
9
10
11
12
13
14
15
16
17
18
19
20
21
22
fun canCompileResourceInJvm(file: File, requirePngCrunching: Boolean): Boolean {
// Hidden files, while skipped, are still supported.
if (file.isHidden) return true

val pathData = extractPathData(file)
if (pathData.resourceDirectory == VALUES_DIRECTORY_PREFIX
&& pathData.extension == XML_EXTENSION) {//values目录下的xml文件返回true
// file is a values table.
return true
} else {
val type = ResourceType.fromFolderName(pathData.resourceDirectory) ?: return false
if (type != ResourceType.RAW) {
if (pathData.extension == XML_EXTENSION) {//res目录下的的xml文件
return true
} else if (pathData.extension.endsWith(PNG_EXTENSION)) {//
// If we don't need to perform patch9 processing or png crunching we can process.
return pathData.extension != PATCH_9_EXTENSION && !requirePngCrunching
}
}
}
return true
}

关于requirePngCrunching如何设置,我们可以在buildTypes中配置minifyEnabledshrinkResources

1
2
3
4
5
6
7
8
9
10
11
android {
...
buildTypes {
getByName("release") {
isMinifyEnabled = true
isShrinkResources= true
...
}
}
}

ResourceCompilerRunnable

ResourceCompilerRunnable实现了WorkAction接口,这是AGP自己用于执行并行工作的API。通过submit这个action会执行execute方法

1
2
3
4
5
6
7
8
9
10
11
12
13
14
15
16
17
18
19
  override fun run() {
parameters.request.get().forEach {
compileSingleResource(it)
}
}
companion object {
@JvmStatic
fun compileSingleResource(request: CompileResourceRequest) {
val options = ResourceCompilerOptions(
pseudolocalize = request.isPseudoLocalize,
partialRFile = request.partialRFile,
legacyMode = true,
sourcePath = request.sourcePath)

// TODO: find a way to re-use the blame logger between requests
val blameLogger = blameLoggerFor(request, LoggerWrapper.getLogger(this::class.java))
compileResource(request.inputFile, request.outputDirectory, options, blameLogger)
}
}

取出request中的CompileResourceRequest并行执行compileSingleResource方法,在内部执行compileResource方法:

1
2
3
4
5
6
7
8
9
10
11
12
13
14
15
16
17
18
19
20
21
22
23
24
25
26
27
28
29
30
31
32
33
34
fun compileResource(
file: File, outputDirectory: File, options: ResourceCompilerOptions, logger: BlameLogger) {

//...
// Extract resource type information from the full path.
val pathData = extractPathData(file, options.sourcePath ?: file.absolutePath)
// Determine how to compile the file based on its type.
val compileFunction = getCompileMethod(pathData, logger)
//...
}
private fun getCompileMethod(pathData: ResourcePathData, logger: BlameLogger):
(ResourcePathData, File, ResourceCompilerOptions, BlameLogger) -> Unit {
if (pathData.resourceDirectory == VALUES_DIRECTORY_PREFIX &&
pathData.extension == XML_EXTENSION) {
pathData.extension = RESOURCE_TABLE_EXTENSION
return ::compileTable
} else {
val type = ResourceType.fromFolderName(pathData.resourceDirectory)
if (type == null) {
val errorMsg = "Invalid resource type '${pathData.resourceDirectory}'" +
" for file ${pathData.file.absolutePath}"
logger?.warning(errorMsg)
error(errorMsg)
}
if (type != ResourceType.RAW) {
if (pathData.extension == XML_EXTENSION) {
return ::compileXml
} else if (pathData.extension.endsWith(PNG_EXTENSION)) {
return ::compilePng
}
}
}
return ::compileFile
}

values目录下的xml资源使用compileTable方法,res目录下的xml资源使用compileXml方法,png资源使用compilePng方法。最终会在build/intermediates/merged_res/debug/目录下生成XXXX.xml.flatXXXX.arsc.flatXXXX.webp.flat文件。具体如何生成由于篇幅的原因,感兴趣可以自己查看代码。

Aapt2CompileRunnable

Aapt2CompileRunnable方法内部的执行流程

1
2
3
4
5
6
7
8
9
10
11
12
13
14
15
16
17
18
19
20
21
22
23
24
25
26
27
28
29
30
31
32
33
34
35
abstract class Aapt2CompileRunnable : ProfileAwareWorkAction<Aapt2CompileRunnable.Params>() {

override fun run() {
runAapt2Compile(
parameters.aapt2Input.get(),
parameters.requests.get(),
parameters.enableBlame.getOrElse(false)
)
}
//...
}

fun runAapt2Compile(
aapt2Input: Aapt2Input,
requests: List<CompileResourceRequest>,
enableBlame: Boolean
) {
val logger = Logging.getLogger(Aapt2CompileRunnable::class.java)
val loggerWrapper = LoggerWrapper(logger)
val daemon = aapt2Input.getLeasingAapt2()
val errorFormatMode = aapt2Input.buildService.get().parameters.errorFormatMode.get()
requests.forEach { request ->
try {
daemon.compile(request, loggerWrapper)//
} catch (exception: Aapt2Exception) {
throw rewriteCompileException(
exception,
request,
errorFormatMode,
enableBlame,
logger
)
}
}
}
1
2
3
4
5
fun getLeasingAapt2(aapt2Input: Aapt2Input) : Aapt2 {
val manager = getManager(Aapt2DaemonServiceKey(aapt2Input.version.get()), getAapt2ExecutablePath(aapt2Input))
val leasingAapt2 = manager.leasingAapt2Daemon
return PartialInProcessResourceProcessor(leasingAapt2)
}


Aapt2被封装成buildService。这行代码apt2Input.getLeasingAapt2()最终会返回PartialInProcessResourceProcessor

1
2
3
4
5
6
7
8
9
10
class PartialInProcessResourceProcessor (val delegate: Aapt2):
Aapt2 {
override fun compile(request: CompileResourceRequest, logger: ILogger) {
//...
delegate.compile(request, logger)
}
override fun link(request: AaptPackageConfig, logger: ILogger) = delegate.link(request, logger)

override fun convert(request: AaptConvertConfig, logger: ILogger) = delegate.convert(request,logger)
}

调用PartialInProcessResourceProcessorcompile会调用其代理对象delegatecompile方法。delegate就是Aapt2DaemonManager中的leasingAapt2Daemon

1
2
3
4
5
6
7
8
9
10
11
12
13
val leasingAapt2Daemon = object : Aapt2 {
override fun compile(request: CompileResourceRequest, logger: ILogger) {
leaseDaemon().use { it.compile(request, logger) }
}

override fun link(request: AaptPackageConfig, logger: ILogger) {
leaseDaemon().use { it.link(request, logger) }
}

override fun convert(request: AaptConvertConfig, logger: ILogger) {
leaseDaemon().use { it.convert(request, logger) }
}
}

leaseDaemon方法会从已启动的守护进程池中返回LeasedAaptDaemon

1
2
3
4
5
6
7
8
9
10
11
12
13
14
15
16
17
  fun leaseDaemon(): LeasedAaptDaemon {
val daemon =
pool.find { !it.busy } ?: newAaptDaemon()
daemon.busy = true
return LeasedAaptDaemon(daemon, this::returnProcess)
}
private fun newAaptDaemon(): LeasableAaptDaemon {
val displayId = latestDisplayId++
val process = daemonFactory.invoke(displayId)
val daemon = LeasableAaptDaemon(process, timeSource.read())
if (pool.isEmpty()) {
listener.firstDaemonStarted(this)
}
pool.add(daemon)
return daemon
}

daemonFactory其实就是在Aapt2DaemonBuildService通过调用getManager方法时设置进去的回调:

1
2
3
4
5
6
7
8
9
10
11
12
13
14
15
16
17
18
private fun getManager(key: Aapt2DaemonServiceKey, aaptExecutablePath: Path) : Aapt2DaemonManager {
return services.getOrPut(key) {
Aapt2DaemonManager(
logger = logger,
daemonFactory = { displayId ->
Aapt2DaemonImpl(
displayId = "#$displayId",
aaptExecutable = aaptExecutablePath,
daemonTimeouts = daemonTimeouts,
logger = logger
)
},
expiryTime = daemonExpiryTimeSeconds,
expiryTimeUnit = TimeUnit.SECONDS,
listener = Aapt2DaemonManagerMaintainer()
)
}.also { closer.register(Closeable { it.shutdown() }) }
}

daemonFactory就是一个bock,getManager的时候会实例化Aapt2DaemonImpl对象。
通过层层的包装,调用LeasedAaptDaemoncompile方法本质就是调用Aapt2DaemonImplcompile
Aapt2DaemonImpl继承Aapt2Daemon,并实现doCompile、doLink、startProcess、stopProcess等抽象方法
直接看compile代码的实现:

1
2
3
4
5
6
override fun compile(request: CompileResourceRequest, logger: ILogger) {
checkStarted()
//...
doCompile(request, logger)
//...
}

先是调用了checStarted检查当前的进程状态,需要开启进程的话会先调用startProcess方法来创建新的aapt进程

1
2
3
4
5
6
7
8
9
10
11
12
13
 private fun checkStarted() {
when (state) {
State.NEW -> {
//...
startProcess()
}
State.RUNNING -> {
// Already ready
...
}
State.SHUTDOWN -> error("$displayName: Cannot restart a shutdown process")
}
}
1
2
3
4
5
6
7
8
9
10
11
12
13
14
 override fun startProcess() {
val waitForReady = WaitForReadyOnStdOut(displayName, logger)
processOutput.delegate = waitForReady
val processBuilder = ProcessBuilder(aaptCommand)
process = processBuilder.start()
writer = try {
GrabProcessOutput.grabProcessOutput(
process,
GrabProcessOutput.Wait.ASYNC,
processOutput)
process.outputStream.bufferedWriter(Charsets.UTF_8)
}
//...
}

通过ProcessBuilder创建aapt进程,apptCommand就是你电脑本地的aapt本地可执行文件。进程创建成功后,通过GrabProcessOutput设置进程的输入输出,之后就可以和进程打交道,比如写入编译命令,从进程中读取执行结果。
进程创建完后接着调用doCompile开始编译资源:

1
2
3
4
5
6
7
8
9
10
11
12
13
14
15
16
@Throws(TimeoutException::class, Aapt2InternalException::class, Aapt2Exception::class)
override fun doCompile(request: CompileResourceRequest, logger: ILogger) {
val waitForTask = WaitForTaskCompletion(displayName, logger)
try {
processOutput.delegate = waitForTask
//写入编译命令
Aapt2DaemonUtil.requestCompile(writer, request)
// Temporary workaround for b/111629686, manually generate the partial R file for raw and non xml res.
//...
//等待进程执行编译的结果
val result = waitForTask.future.get(daemonTimeouts.compile, daemonTimeouts.compileUnit)
//...
} finally {
processOutput.delegate = noOutputExpected
}
}

requestCompile方法用来负责拼接写入aapt执行命令的参数,writer就是之前创建aapt进程时写入句柄。关于aapt编译命令选项可参考官方文档:compile_options

1
2
3
4
5
6
7
8
9
10
11
12
13
14
15
16
17
18
19
20
21
22
23
24
25
26
27
28
29
30
31
32
33
34
35
36
37
38
39
40
41
42
43
44
45
46
47
48
  public static void requestCompile(
@NonNull Writer writer, @NonNull CompileResourceRequest command) throws IOException {
request(writer, "c", AaptV2CommandBuilder.makeCompileCommand(command));
}

fun makeCompileCommand(request: CompileResourceRequest): ImmutableList<String> {
val parameters = ImmutableList.Builder<String>()

if (request.isPseudoLocalize) {
parameters.add("--pseudo-localize")
}

if (!request.isPngCrunching) {
// Only pass --no-crunch for png files and not for 9-patch files as that breaks them.
val lowerName = request.inputFile.path.toLowerCase(Locale.US)
if (lowerName.endsWith(SdkConstants.DOT_PNG)
&& !lowerName.endsWith(SdkConstants.DOT_9PNG)) {
parameters.add("--no-crunch")
}
}

if (request.partialRFile != null) {
parameters.add("--output-text-symbols", request.partialRFile!!.absolutePath)
}

parameters.add("--legacy")
parameters.add("-o", request.outputDirectory.absolutePath)
parameters.add(request.inputFile.absolutePath)

request.sourcePath.let {
parameters.add("--source-path")
parameters.add(it)
}
return parameters.build()
}
private static void request(Writer writer, String command, Iterable<String> args)
throws IOException {
writer.write(command);
writer.write('\n');
for (String s : args) {
writer.write(s);
writer.write('\n');
}
// Finish the request
writer.write('\n');
writer.write('\n');
writer.flush();
}

最终也会在build/intermediates/merged_res/debug/目录下生成目标文件。

最后

MergeResources主流程到这里就分析完了,虽然篇幅已经很长了。但是只分析了全量构建的流程,还有如何实现资源增量构建以及如何使用Java方式生成protocol文件格式,感兴趣的朋友可以自行查看。