okhttp拦截器之ConnectInterceptor

导言

之前讲到的拦截器都是一些关于响应前和响应后的处理,并没触及到网络连接的核心。比如DNS解析、TCL连接、TSL握手、连接池复用等。这些内容都在这次讲到的ConnectInterceptor拦截器中,既然这么重要那就到源码中一探究竟吧:

ConnectInterceptor::interce

1
2
3
4
5
6
7
8
9
object ConnectInterceptor : Interceptor {
@Throws(IOException::class)
override fun intercept(chain: Interceptor.Chain): Response {
val realChain = chain as RealInterceptorChain
val exchange = realChain.call.initExchange(chain)
val connectedChain = realChain.copy(exchange = exchange)
return connectedChain.proceed(realChain.request)
}
}

该拦截器的主要作用:打开一个目标服务器连接,然后将这个请求叫个下一个拦截其处理。这个连接其实就是TCP连接,用于网络请求的请求和响应。

如何获取连接

拦截器中的关键代码就是调用RealCallinitExchange方法,它会返回一个Exchange对象。从字面含义Exchange是交换的意思,在这里把一次网络请求和响应当作一次数据交换。

RealCall::initExchange

1
2
3
4
5
6
7
8
9
10
11
12
13
14
15
16
17
18
19
20
21
22
23
24
25
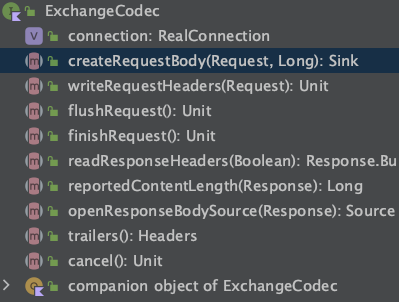
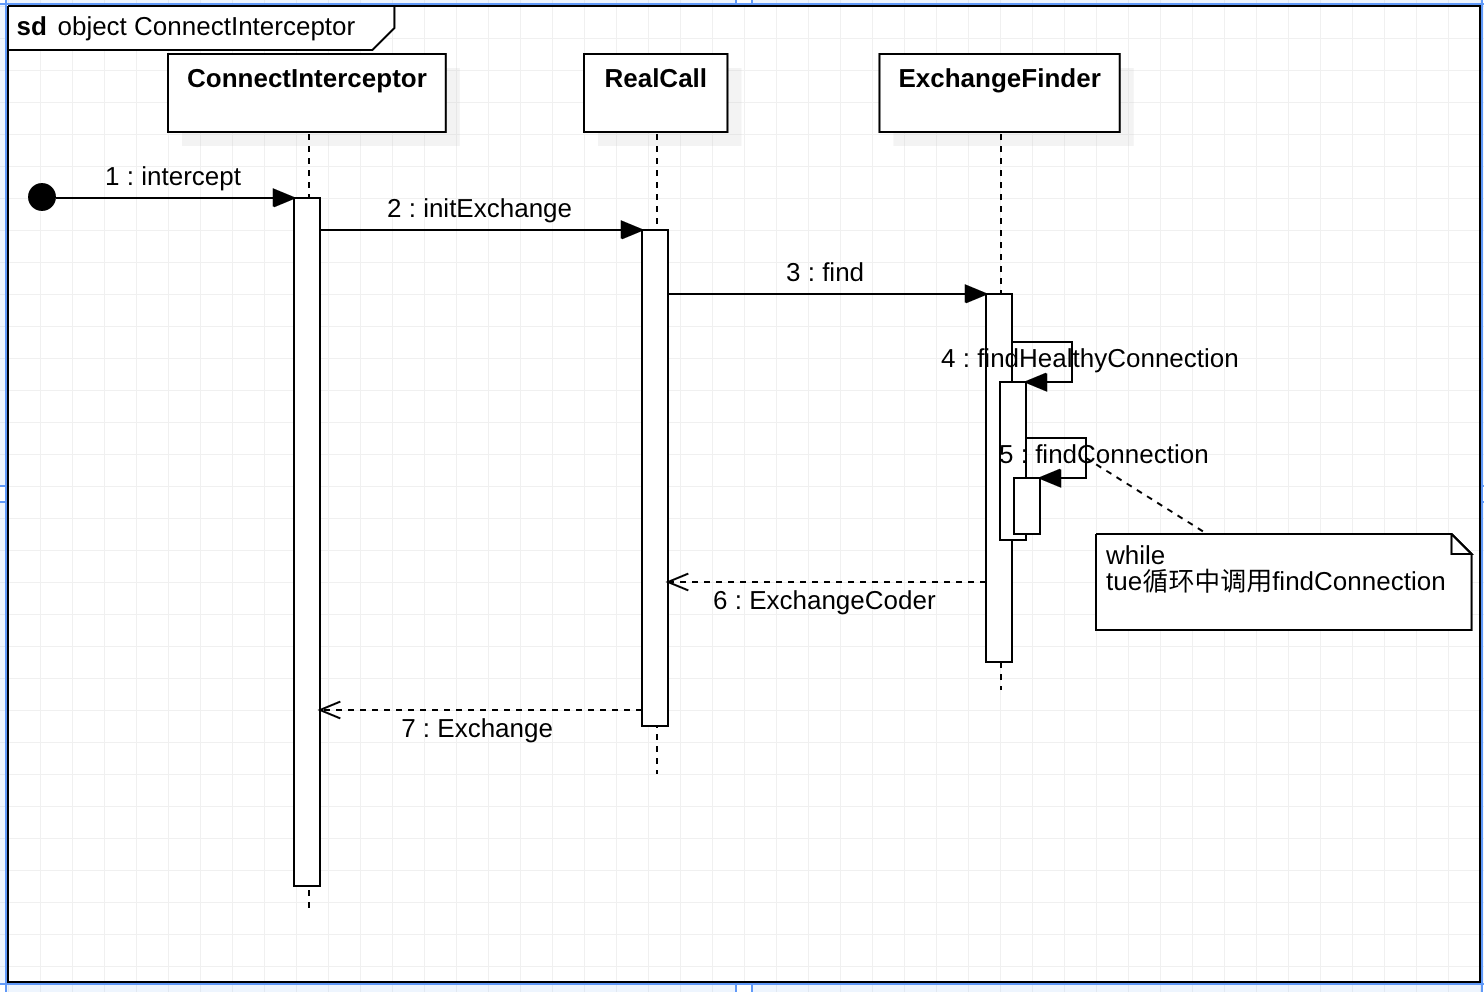
/** Finds a new or pooled connection to carry a forthcoming request and response. */
internal fun initExchange(chain: RealInterceptorChain): Exchange {
synchronized(this) {
check(expectMoreExchanges) { "released" }
check(!responseBodyOpen)
check(!requestBodyOpen)
}

val exchangeFinder = this.exchangeFinder!!
//找到一个ExchangeCode
val codec = exchangeFinder.find(client, chain)
//把ExchangeCode用于构造一个Exchange
val result = Exchange(this, eventListener, exchangeFinder, codec)
this.interceptorScopedExchange = result
this.exchange = result
synchronized(this) {
this.requestBodyOpen = true
this.responseBodyOpen = true
}

if (canceled) throw IOException("Canceled")
//返回创建的Exchagne对象
return result
}

注意该放的注释:找到一个新的或者连接池中一个健康可用的连接,用于即将到来了请求和响应。那很明显ExchangeFinder.find方法创建或重用连接池的逻辑都在这里面。先不急看该方法。解释下刚出现的两个类:ExchangeCodeExchange,先看他们类注释:

ExchangeCodec

1
2
3
4
/** Encodes HTTP requests and decodes HTTP responses. */
interface ExchangeCodec {
//...
}

它是一个接口,ExchangeCodec应是ExchangeCodeDecode缩写,用于对HTTP请求的编码和响应的解码。具体的实现类有两个,分别是Http1ExchangeCodecHttp2ExchangeCodec。拥有的能力如下图:
image.png
挑一个Http1ExchangeCodecwriteRequestHeaders看看具体实现:

1
2
3
4
5
6
7
8
9
10
11
12
13
14
15
16
17
override fun writeRequestHeaders(request: Request) {
val requestLine = RequestLine.get(request, connection.route().proxy.type())
writeRequest(request.headers, requestLine)
}

fun writeRequest(headers: Headers, requestLine: String) {
check(state == STATE_IDLE) { "state: $state" }
sink.writeUtf8(requestLine).writeUtf8("\r\n")
for (i in 0 until headers.size) {
sink.writeUtf8(headers.name(i))
.writeUtf8(": ")
.writeUtf8(headers.value(i))
.writeUtf8("\r\n")
}
sink.writeUtf8("\r\n")
state = STATE_OPEN_REQUEST_BODY
}

可以看出就是负责把Request转化成HTTP标准报文的格式,方便后续发送给服务端。I/O操作用到了OkIo,有兴趣可自行查阅。

Exchange

1
2
3
4
5
6
7
/**
* Transmits a single HTTP request and a response pair. This layers connection management and events
* on [ExchangeCodec], which handles the actual I/O.
*/
class Exchange(//...){
//...
}

该类用于传输一对单个Http请求的请求和响应,负责管理连接和ExchangeCodec。同样查看一下Exchange类的writerRequestHeaders方法:

1
2
3
4
5
6
7
8
9
10
11
12
13
14
15
@Throws(IOException::class)
fun writeRequestHeaders(request: Request) {
try {
//触发requestHeaders监听开始
eventListener.requestHeadersStart(call)
//真正的实现交给ExchangeCodec
codec.writeRequestHeaders(request)
//requestHeaders监听结束
eventListener.requestHeadersEnd(call, request)
} catch (e: IOException) {
eventListener.requestFailed(call, e)
trackFailure(e)
throw e
}
}

可以看到,方法内部实际上是把工作交给了ExchangeCodecExchange可以看做是对ExchangeCodec的封装,Exchange负责管理连接,ExchangeCodec负责处理具体的编码和解码。

ExchangeFinder

ExchangeFinder命名来看,把一次网络请求和响应作为一次数据的exchange(交换),Finder用来查找一个合适的Exchange,也就是发现一个合适的网络连接。具体是怎么回事先看下ExchangeFinder类的注释说明:
exchangefinder
尝试查找一个以可用的连接遵循上图红框中的四个策略,大概意思如下:

  1. 如果当前已经存在一个可以满足请求的连接,则使用它。
  2. 如果在连接池中有个可以满足的连接,则使用它。需要注意的是,共享的exchanges可以向不同的主机名发送请求。具体的细节在RealConnection.isEligible这个校验连接合格的方法。
  3. 如果没有一个现存的连接,列出所有的路由并尝试建立新连接。如果连接失败,会重试迭代可用的路有列表。
  4. 如果一个接连正在尝试DNS解析、TCP连接或TLS握手的时候从池子中获取了一个合格的连接。只有当获取的连接是HTTP2采用multiplexed多路复用,会把重复的连接删除掉。

如果现在对注释的内容还不太了解,看了ExchangeFinder的代码后相信一定明白,而且带着注释的看代码,也有助于理解代码为什么这么设计。

ExchangeFinder::find

官方给这个方法的解释是:Finds a new or pooled connection to carry a forthcoming request and respons————创建一个新的或者从连接池找到一个连接,用来处理即将到来的请求和响应。

1
2
3
4
5
6
7
8
9
10
11
12
13
14
15
16
17
18
19
20
21
22
23
24
fun find(
client: OkHttpClient,
chain: RealInterceptorChain
): ExchangeCodec {
try {
//找到一个健康可用的连接
val resultConnection = findHealthyConnection(
connectTimeout = chain.connectTimeoutMillis,
readTimeout = chain.readTimeoutMillis,
writeTimeout = chain.writeTimeoutMillis,
pingIntervalMillis = client.pingIntervalMillis,
connectionRetryEnabled = client.retryOnConnectionFailure,
doExtensiveHealthChecks = chain.request.method != "GET"
)
//通过获取的连接,创基一个ExchangeCodec
return resultConnection.newCodec(client, chain)
} catch (e: RouteException) {
trackFailure(e.lastConnectException)
throw e
} catch (e: IOException) {
trackFailure(e)
throw RouteException(e)
}
}

该方法中获取一个健康可用的连接,并通过它创建有个用于编码和解吗的ExchagneCodec,通过之前的分析ExchangeCodec用于连接的管理和I/O的处理,那么其实就可以和服务器通信了。

ExchangeFinder::findHealthyConnection

上面调用了ExchangeFinder::findHealthyConnection方法,获取了一个健康可用的连接,该方法如下

1
2
3
4
5
6
7
8
9
10
11
12
13
14
15
16
17
18
19
20
21
22
23
24
25
26
27
28
29
30
31
32
33
34
35
36
37
38
39
40
41
42
43
@Throws(IOException::class)
private fun findHealthyConnection(
connectTimeout: Int,
readTimeout: Int,
writeTimeout: Int,
pingIntervalMillis: Int,
connectionRetryEnabled: Boolean,
doExtensiveHealthChecks: Boolean
): RealConnection {
while (true) {
//获取一个候选的连接
val candidate = findConnection(
connectTimeout = connectTimeout,
readTimeout = readTimeout,
writeTimeout = writeTimeout,
pingIntervalMillis = pingIntervalMillis,
connectionRetryEnabled = connectionRetryEnabled
)

// Confirm that the connection is good.
//检查连接是否健康,该连接是否已准备好
if (candidate.isHealthy(doExtensiveHealthChecks)) {
return candidate
}

// If it isn't, take it out of the pool.
//如果该连接不健康,则标记该连接不在使用
candidate.noNewExchanges()

// Make sure we have some routes left to try. One example where we may exhaust all the routes
// would happen if we made a new connection and it immediately is detected as unhealthy.
//确保有可尝试的路由
if (nextRouteToTry != null) continue

val routesLeft = routeSelection?.hasNext() ?: true
if (routesLeft) continue

val routesSelectionLeft = routeSelector?.hasNext() ?: true
if (routesSelectionLeft) continue
//如果没有可用的路由抛出异常
throw IOException("exhausted all routes")
}
}

从该方法的注释可以看出:该方法会查找到一个可用且健康的连接并将其返回,如果找到的可用连接是不健康的,那么会一直重复查找可用连接的这个过程,直到一个可用且健康的连接被找到
该方法内部有一个while(true)的循环,在循环代码里面,会不断地去获取一个可用连接,并检查该连接是否健康,如果该连接健康,就将其返回,如果连接不健康,在有可尝试的路由的前提下,会重复前面查找可用连接的过程。注意,这里说的可用和健康是两个不同的指标

RealConnection::isHealthy

判断连接是否健康的是RealConnection::isHealthy方法:

1
2
3
4
5
6
7
8
9
10
11
12
13
14
15
16
17
18
19
20
21
22
23
24
25
26
27
 //如果此连接已准备好托管新流,则返回true。
fun isHealthy(doExtensiveChecks: Boolean): Boolean {
assertThreadDoesntHoldLock()

val nowNs = System.nanoTime()

val rawSocket = this.rawSocket!!
val socket = this.socket!!
val source = this.source!!
//判断socket是否可用
if (rawSocket.isClosed || socket.isClosed || socket.isInputShutdown ||
socket.isOutputShutdown) {
return false
}
//如果是HTTP2连接,检测HTTP2连接是否健康
val http2Connection = this.http2Connection
if (http2Connection != null) {
return http2Connection.isHealthy(nowNs)
}

val idleDurationNs = synchronized(this) { nowNs - idleAtNs }
//如果空闲时间达到某个值后,检测socket是否健康
if (idleDurationNs >= IDLE_CONNECTION_HEALTHY_NS && doExtensiveChecks) {
return socket.isHealthy(source)
}
return true
}

ExchangeFinder::findConnection

findHealthyConnection方法中调用findConnection方法获取一个候选的连接。该方法代码比较多,逻辑相对比较复杂,也和一开始讲ExchangeFinder类中注释的内容息息相关。

1
2
3
4
5
6
7
8
9
10
11
12
13
14
15
16
17
18
19
20
21
22
23
24
25
26
27
28
29
30
31
32
33
34
35
36
37
38
39
40
41
42
43
44
45
46
47
48
49
50
51
52
53
54
55
56
57
58
59
60
61
62
63
64
65
66
67
68
69
70
71
72
73
74
75
76
77
78
79
80
81
82
83
84
85
86
87
88
89
90
91
92
93
94
95
96
97
98
99
100
101
102
103
104
105
106
107
108
109
110
111
112
113
114
115
116
117
118
119
120
121
122
123
124
125
126
127
128
129
130
131
132
133
134
135
136
137
138
139
140
141
142
// 返回一个连接去承载新的流,优先使用现有连接,接着是连接池中的连接,最后是创建一个新的连接
private fun findConnection(
connectTimeout: Int,
readTimeout: Int,
writeTimeout: Int,
pingIntervalMillis: Int,
connectionRetryEnabled: Boolean
): RealConnection {
//检测取消call
if (call.isCanceled()) throw IOException("Canceled")

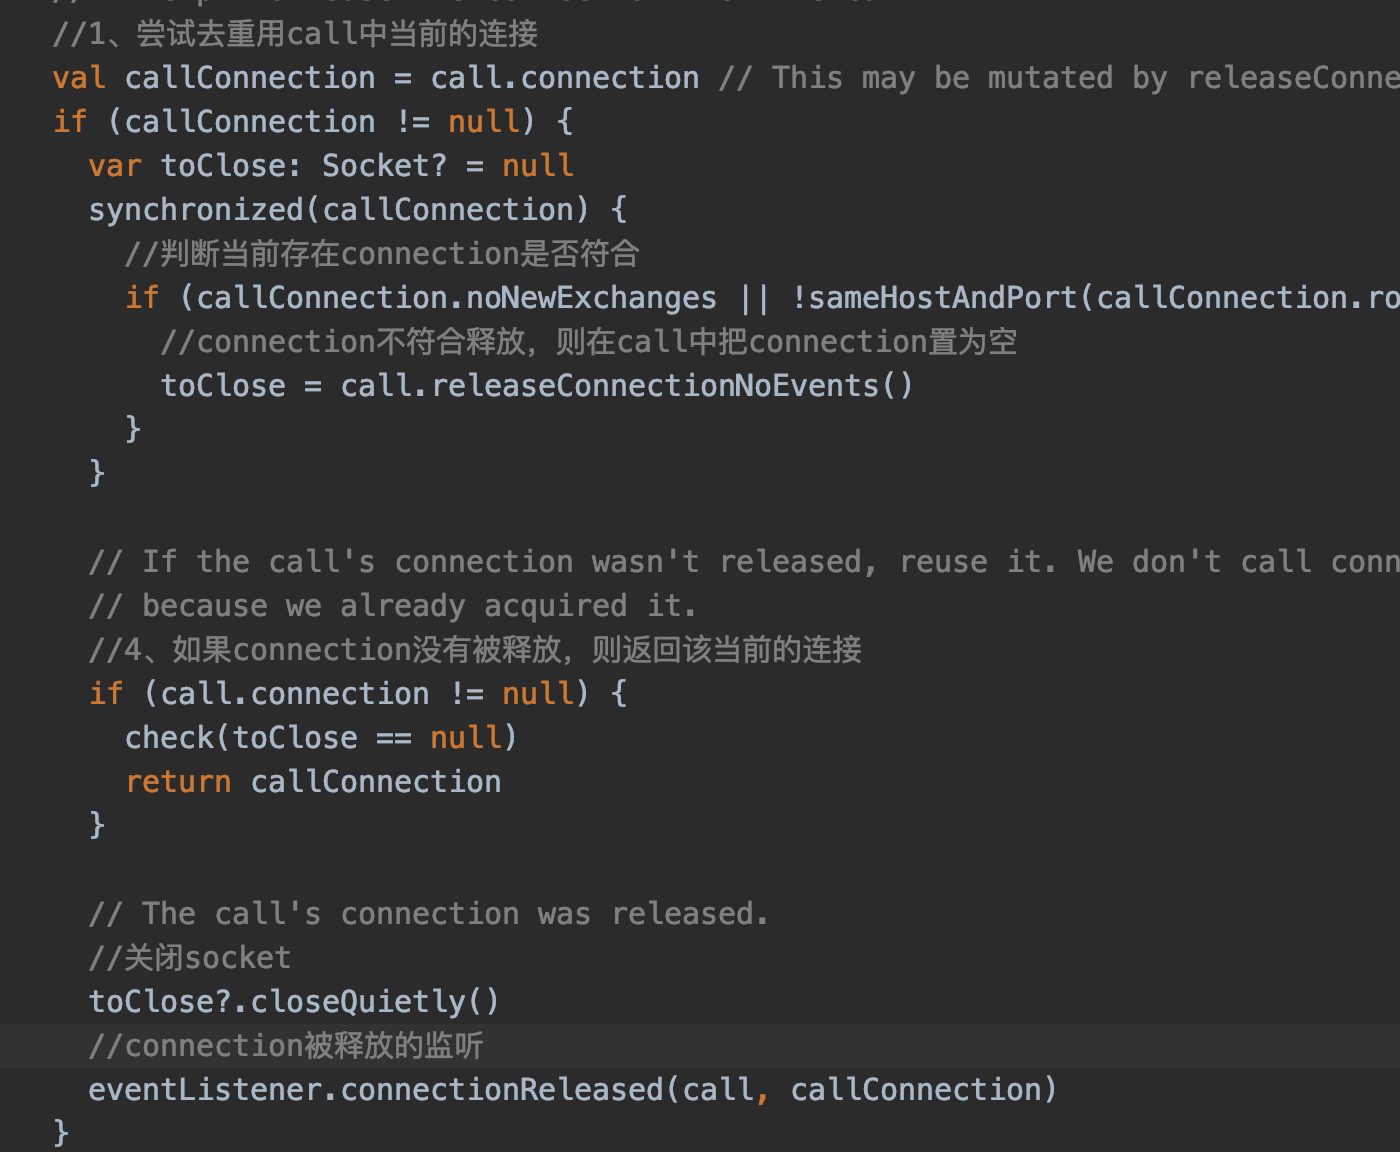
// Attempt to reuse the connection from the call.
//1、尝试去重用call中当前的连接
val callConnection = call.connection // This may be mutated by releaseConnectionNoEvents()!
if (callConnection != null) {
var toClose: Socket? = null
synchronized(callConnection) {
//判断当前存在connection是否符合
if (callConnection.noNewExchanges || !sameHostAndPort(callConnection.route().address.url)) {
//connection不符合释放,则在call中把connection置为空
toClose = call.releaseConnectionNoEvents()
}
}

// If the call's connection wasn't released, reuse it. We don't call connectionAcquired() here
// because we already acquired it.
//4、如果connection没有被释放,则返回该当前的连接
if (call.connection != null) {
check(toClose == null)
return callConnection
}

// The call's connection was released.
//关闭socket
toClose?.closeQuietly()
//connection被释放的监听
eventListener.connectionReleased(call, callConnection)
}

// We need a new connection. Give it fresh stats.
refusedStreamCount = 0
connectionShutdownCount = 0
otherFailureCount = 0

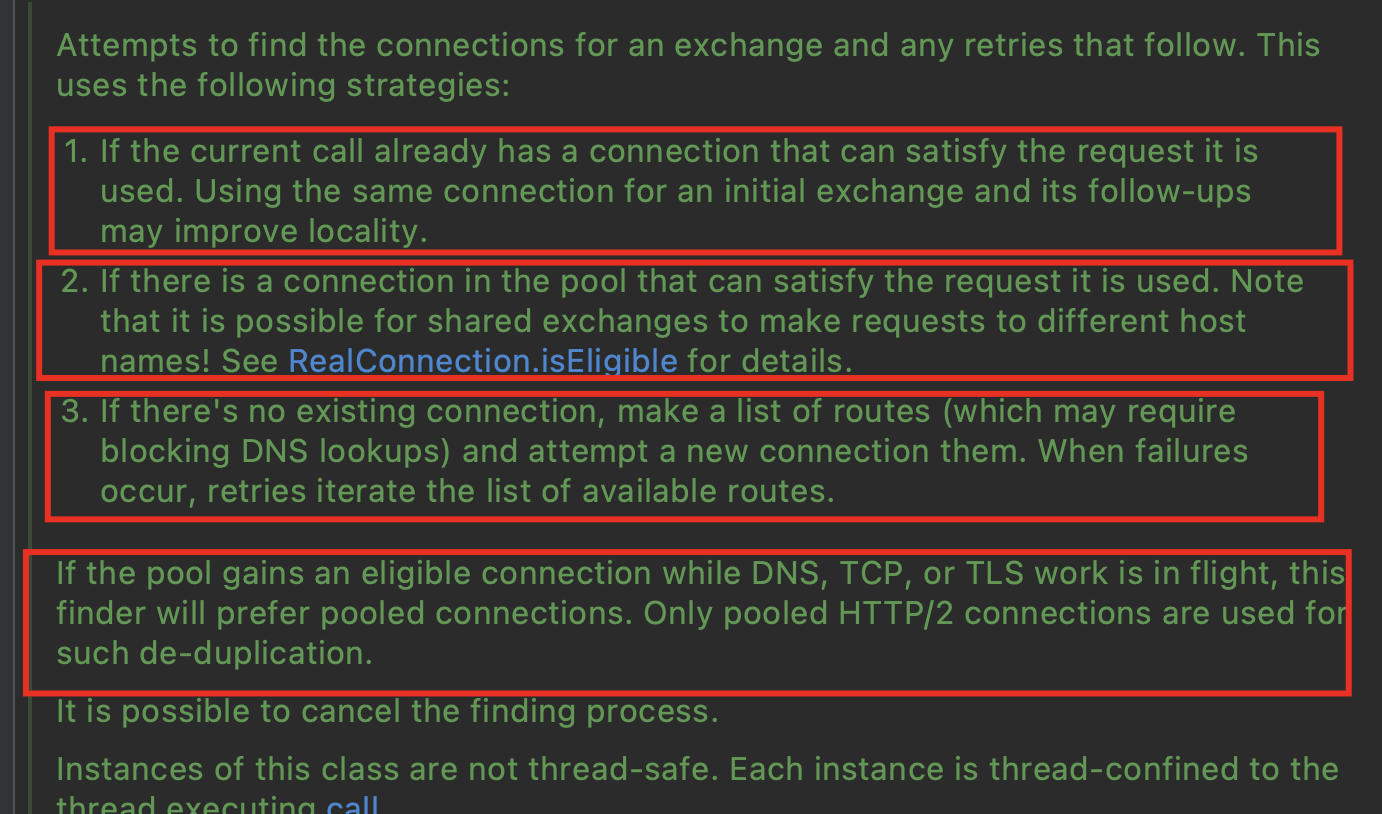
// Attempt to get a connection from the pool.
//2、 第一次尝试从连接池中获取连接,注意此时的第三个参数routes为空,第三个参数requireMultiplexed为false
// callAcquirePooledConnection内部判断是个同步方法
if (connectionPool.callAcquirePooledConnection(address, call, null, false)) {
val result = call.connection!!
eventListener.connectionAcquired(call, result)
//返回连接
return result
}

// Nothing in the pool. Figure out what route we'll try next.
//如果第一次没从池子中获取到连接,那弄清楚我们接下来要尝试的路由
val routes: List<Route>?
val route: Route
//第一次进来nextRouteToTry
if (nextRouteToTry != null) {
// Use a route from a preceding coalesced connection.
routes = null
route = nextRouteToTry!!
nextRouteToTry = null
} else if (routeSelection != null && routeSelection!!.hasNext()) {
// Use a route from an existing route selection.
routes = null
route = routeSelection!!.next()
} else {
// Compute a new route selection. This is a blocking operation!
//计算一个新的routeSelection,这是一个阻塞的操作
var localRouteSelector = routeSelector
//如果localRouteSelector为则创建一个
if (localRouteSelector == null) {
localRouteSelector = RouteSelector(address, call.client.routeDatabase, call, eventListener)
this.routeSelector = localRouteSelector
}
//从routeSelector中获取一个新的routeSelection
val localRouteSelection = localRouteSelector.next()
routeSelection = localRouteSelection
//获取从routeSelector中的route列表
routes = localRouteSelection.routes

if (call.isCanceled()) throw IOException("Canceled")

// Now that we have a set of IP addresses, make another attempt at getting a connection from
// the pool. We have a better chance of matching thanks to connection coalescing.
//3、第二次从连接池中获取连接,此时是routes不为空,也就是有一组IP地址。
if (connectionPool.callAcquirePooledConnection(address, call, routes, false)) {
val result = call.connection!!
eventListener.connectionAcquired(call, result)
//返回连接
return result
}
//如果第二次从连接池没拿到,则从routeSelection获取下一个路由,用于创建新的连接。
route = localRouteSelection.next()
}

// Connect. Tell the call about the connecting call so async cancels work.
// 4、因为第二次没有从连接池获取到,则创建一个新的连接
val newConnection = RealConnection(connectionPool, route)
call.connectionToCancel = newConnection
try {
//执行TCP或TCP+TLS握手。
newConnection.connect(
connectTimeout,
readTimeout,
writeTimeout,
pingIntervalMillis,
connectionRetryEnabled,
call,
eventListener
)
} finally {
call.connectionToCancel = null
}
call.client.routeDatabase.connected(newConnection.route())

// If we raced another call connecting to this host, coalesce the connections. This makes for 3
// different lookups in the connection pool!
//5、第三次从连接池中获取连接。这是因为如果已经创建了一个指向相同主机的连接,并且连接放到连接池里去了。
//注意此时requireMultiplexed为true,也就是只适用于HTTP2。
if (connectionPool.callAcquirePooledConnection(address, call, routes, true)) {
//获取call当前的connection
val result = call.connection!!
//保存路由
nextRouteToTry = route
//将当前的连接的socket关闭
newConnection.socket().closeQuietly()
eventListener.connectionAcquired(call, result)
return result
}
//如果第三次从连接池中没有获取到连接,那这次创建的连接放入到连接池中,然后把创建的连接赋值给call中的connection
synchronized(newConnection) {
connectionPool.put(newConnection)
call.acquireConnectionNoEvents(newConnection)
}

eventListener.connectionAcquired(call, newConnection)
//返回当前新创建的连接
return newConnection
}

获取一个可用的连接,分为了5步

  1. 重用call当中的连接
  2. 第一次尝试从连接池获取连接
  3. 第二次尝试从连接池获取连接
  4. 自己新创建一个连接
  5. 第三次尝试从连接池获取连接

看到这里先对整个流程做个总结:
image2.png

连接复用

1.重用call当前的连接

findConnection方法中一大段代码,为了更好的理解我们可以把代码做分段然处理,第一部分如下:

就是获取一个可用连接的第一步,获取call当前的连接之后,对该连接做了两个判断,分别是

  • 判断是否不再接受新的连接
  • 判断和当前请求是否有相同的主机名和端口号

回想之前看ExchangeFinder类注释的时候。其中有一条也讲到如果call中有一个满足条件的connection,则重用它:

这句话所对应的代码就是刚刚讲的部分,可以看出一个优秀的框架,注释都写的很清楚。

代理与路由

在上面获取连接的时候,为什么要分三次从连接池中获取呢🤔️,每次从连接池获取又有什么不同呢🤔️,要解答这些问题,需要一些http相关的的知识:http中的代理、路由、Http2的多路复用。

代理即代理服务器(Proxy Server),代理服务器是介于客户端和服务器之间的一台服务器,客户端发送给服务器的请求都由代理服务器进行转发,如果没有代理,则客户端直接与服务器进行交互。通过代理服务器,客户端可以隐藏身份,防止受到外来攻击。

在OkHttp中出现两种代理类型:

  • HTTP代理:能够代理客户端进行HTTP访问,主要是代理浏览器访问网页,它的端口号一般为80、8080
  • SOCKS代理:SOCKS代理与其他类型的代理不同,它只是简单地传递数据包,并不关心是何种应用协议,因此SOCKS代理服务器比其他类型的代理服务器速度要快得多。
    其中SOCKS4只支持TCP协议,而SOCKS5既支持TCP协议又支持UDP协议。

在OkHttp中,对于SOCKS代理,代理服务器完成TCP数据包的转发工作,而HTTP代理,除了转发数据之外,还会解析HTTP的请求及响应,并根据请求及响应的内容做一些处理。

代理

在Java中,通过Java.net.Proxy类来描述一个代理服务器:

1
2
3
4
5
6
7
8
9
10
11
12
13
14
15
16
public class Proxy {
public enum Type {
// 不使用代理
DIRECT,
// HTTP代理
HTTP,
// SOCKS代理
SOCKS
};

// 代理类型
private Type type;
// Socket地址
private SocketAddress sa;
...
}

该类主要包含了代理类型以及代理服务器对应的SocketAddress,其中代理类型有三种:

  • DIRECT:不使用代理
  • HTTP:使用HTTP代理
  • SOCKS:使用SOCKS代理

路由

路由在OkHttp中抽象出Route来描述网络数据包的传输路径,最主要还是描述直接与其建立TCP连接的目标端点,它表示一个路由信息

1
2
3
4
5
6
7
8
9
10
class Route(
// 记录请求url相关信息,包括请求的源服务器主机名、端口等信息
@get:JvmName("address") val address: Address,
// 此路由的代理服务器信息
@get:JvmName("proxy") val proxy: Proxy,
// 连接目标地址
@get:JvmName("socketAddress") val socketAddress: InetSocketAddress
) {
...
}

Route中主要记录了这条路由通过的代理服务器信息Proxy、连接目标地址InetSocketAddress,根据代理协议的不同,这里的InetSocketAddress会有不同的含义:

  • 不使用代理:它包含的信息是HTTP服务器经过了DNS解析的IP地址以及协议的端口号。
  • HTTP代理:它包含的信息是代理服务器经过DNS解析的IP地址以及端口号。
  • SOCKS代理:它包含的信息是HTTP服务器的域名和协议端口号。

[https://www.sina.com.cn/](https://www.sina.com.cn/)

  • https: 为协议类型,表面默认端口号443,如果是http默认端口号8080
  • www: 是提供服务的机器的名字(计算机名)
  • sina.com.cn为域名,域名还分级,从后往前依次降低,cn为顶级域名,表示中国。com是二级域名,表示商业机构。sina是三级域名,一般用自己的名字。

主机名:计算机名+域名,及www.sina.com.cn为主机名

一个域名可解析为多个IP地址
一个IP地址可以被多个域名绑定